Sunday, September 13, 2009

A Gentle Hand Massage

Here's a nice feature from Melanie Falick's Weekend Knitting: 50 Unique Projects and Ideas.

It's easy to get so motivated by progress on a knitting project - especially on a week-end when you have a large chunk of free time - that you don't want to stop even though your hands are feeling tired or sore, or your neck, shoulders, or another part of your body are tight. To soothe the hands and relax, take frequent breaks and give yourself a gentle hand massage. These reflexology techniques were shared with me by Karen Cornell-Froehner, a massage therapist in Dutchess County, New York.

  • Remove all jewelry from hands or wrists before starting.
  • To relax the neck and shoulders, shake the hands gently with hands in front of you, then above your head, then out to the side. Finish by handing your hands down at your sides as you continue to shake them. Do this a few times.
  • Cradle one hand inside the other. Using the thumb of the hand that is doing the cradling, begin to make small circular motions at the base of the thumb (the fat pad area) and into the web between the thumb and index finger. Work across the base of the finger pads, then toward the wrist down along the pinky-finger side of the hand. Repeat a few times on both hands.
  • Repeat the hand-shaking sequence.
  • Using your knuckles, massage the opposing hand up and down from the palm, into the wrist area, up to your elbow. You will begin to feel a tingling sensation run up your arms. Massage each hand and arm once. This relaxes the shoulder girdle, the rib cage area, lungs/chest and heart.
  • Cradle one hand in the other again. Using the thumb of the hand that is doing the cradling, massage just under the bottom knuckle joints on the palm side of the other hand (this is the diaphragm line, starting at the thumb and moving gently but firmly to the pinky. Repeat a few times, then change to the other hand.
  • Rest one elbow on a desk or table. Intertwine your fingers into each other and begin to gently flex and extend the hand with the elbow on the surface. Repeat four times. Then rotate the hand gently in a circular motion. Rotate to the right eight times, then repeat to the left. Repeat with the other elbow on the desk or table. This stretches the tendons of the arm.
  • Repeat the hand-shaking sequence.
  • Sweep the knuckles of your index and middle fingers down and up the palm of the other hand, working all the way to the edges of the hand, then up the arm. Repeat with the other hand.
  • With a closed fist, using the heel of the hand, hit the base of the thumb several times. This will soften this thick tissue area. This aids in lower back issues.
  • Finally, sweep your fingertips back and forth across the palms of the opposing hand (sweeping any tension away). Drop your hands to your sides and shake from side to side.

Sunday, September 06, 2009

Fingerless Gloves


One more project is done. I started with the Hand/Wrist Warmers pattern, but got stuck when I got to the thumb opening part. I could not understand the instructions. I tried to get help on the internet, but couldn't find an answer so I ended up looking for another pattern. I discovered Joelle Hoverson's blog, Purl Bee, and liked the Greenaway Fingerless Glove pattern. I had to start all over again, but am happy with the way the gloves turned out.

Now, on the the next project on the list - a scarf.

Magic Loop Knitting

While working on the fingerless gloves, I re-discovered Magic Loop knitting, which uses one circular needle for knitting small diameter projects in the round. This technique is a lot less cumbersome than using double-pointed needles, especially if you're knitting on the bus.

Books


For the past few months, our table was full of cookbooks, but since I embarked on my handmade Christmas project, the cookbooks have been replaced with crochet and knitting books.

Sunday, August 23, 2009

From Shoulderette to Neckwarmer


In the middle of doing the shoulderette, I decided I didn't like the pattern so much. I ripped out whatever was on the needles and started all over again with a pattern I saw in one of the books I borrowed last month. The pattern is called Woven Knit and is basically this:

Row 1: *Knit 1, move yarn to front and slip the next stitch purlwise, move yarn back; repeat from * to end of row.

Row 2: *Purl 1, move yarn to back and slip the next stitch purlwise, move yarn to the front; repeat from * to end of row.

Repeat rows 1 and 2 until piece measures 70", or desired length.

It makes a pretty dense scarf. With 26 stitches cast on, it's about 7" wide. With the same number of stitches, the shoulderette I initially did was about twice as wide.

Another project I'm working on simultaneously is a variation of the Hand/Wrist Warmers from Last-Minute Knitted Gifts. I also have several projects planned from 101 Designer One-Skein Wonders: A world of possibilities inspired by just one skein. I want this Christmas to be a handmade one.

I recently joined Ravelry so I will probably post some of my projects there, too. I hope to be able to make felted bags again soon. That will most likely take a while.

Monday, August 17, 2009

Perfect Hat


I did not make this hat, but I love it. I've been looking for a good summer hat all these years. I would always check out the accessories department whenever I was at a store, but never found one that I liked. Until one day, when I wasn't looking, I found my perfect hat. The best part was it was on sale. It was originally priced at $32.50 and I got it for $9.99. The hat looks like it's made of straw, but is actually made of paper.

Getting Ready for Fall


Before the school term ended, my son made a pair of hand warmers for his handwork class and I was inspired to make one for myself. I found this pattern at Knitty and since I didn't have cable needles, I had to do the cables without needles, which involved some acrobatic hand movements!

I have also been crocheting a bit and whereas most of the crocheting I did involved crocheting in the round, I finally was able to crochet a scarf - a ruffled scarf.

Then, it's back to knitting again. I'm doing a shoulderette using three different colour yarns.

Tuque


In Chicago, this is referred to as simply a cap or a beanie. But in Canada, this is called a tuque, a Canadian term for knitted cap. I made one for myself and another for the hubby (bought too much of the same yarn!). The only difference is mine is cuffed and has some holes at the top.

Saturday, July 18, 2009

Floor Cloth


After buying a blank floor cloth two years ago, I finally was able to work on it this month.

Sunday, June 21, 2009

Cloche


Here's a photo of the cloche. It's not great, but I like it because I can adjust the hat to fit different head sizes.

I am now working on a hat for the hubby.

Friday, June 05, 2009

WIP - Cloche

I've been working on a cloche for the past few weeks. I say the past few weeks because I have had to rip off the project several times as the cloche was too big for my head. I am following a pattern, but then I don't have the correct yarn and needle size so it's been more of a trial-and-error thing. (I had a stash of yarn that I wanted to use before I buy a new stash.) I think I finally got it right. I should be done soon. I hope!

Growing Herbs

I've always wanted to grow herbs, but I don't have a green thumb so I shied away from it. Recently, I took a leap of faith and bought three herbs - rosemary, mint and basil - from the garden store nearby. It's been two weeks and they seem to be thriving despite the lack of direct sunlight. I used some of the basil when I made tuna spread the other day and a few mint leaves for iced tea. I'm excited to use more of these fresh herbs in the coming weeks, especially the basil, which seems to be growing more than the mint. (We were told at the garden store that the mint tends to take over the other plants beside it.)
Posted by Picasa

Saturday, April 18, 2009

Magic Ring

This is a wonderful way of crocheting in the round. I've always struggled whenever I needed to make the starting round. Not anymore!

Here are two useful links:

1) Planet June

Magic Ring (right-handed)

Looking for the left-handed instructions? If not, read on…

What is this ‘Magic Ring’, anyway?

A magic ring is a way to begin crocheting in the round by crocheting over an adjustable loop and then pulling the loop tight. The advantage of the magic ring method (below, right) is that, unlike the regular “chain 2, x single crochet in 2nd chain from hook” method (below, left), there is no hole left in the middle of your starting round.

magic ring vs traditional method
L: ch2, 6 sc in 2nd ch from hook, 2 sc in each st around.
R: magic ring, 6 sc in magic ring, 2 sc in each st around.

How do I make a Magic Ring?

  1. Make a loop a few inches from the end of your yarn. Grasp the join of the loop (where the 2 strands of yarn overlap) between your left thumb and forefinger:
    magic ring
  2. Insert hook into the loop from front to back. Draw up a loop:
    magic ring
  3. Ch 1. Note: this does NOT count as a stitch:
    magic ring
  4. Insert hook into the loop, so you are crocheting over the loop and the yarn tail. Draw up a loop to begin your first sc:
    magic ring
  5. Complete the sc. Continue to crochet over the loop and the yarn tail until you have the required number of sc for your first rnd (6 sc shown here):
    magic ring
  6. Grab the yarn tail and pull to draw the centre of the ring tightly closed:
    magic ring
  7. Begin your second round by crocheting into the first stitch of the first round (below, left). At the end of round 2 your work will look like this (below, right):
    magic ring

You’ll never go back to your old method again, I promise!


2) Crochet Me

Adjustable Ring

1
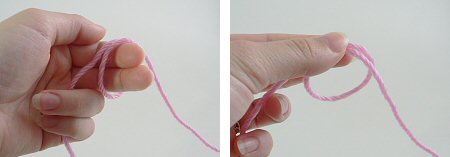
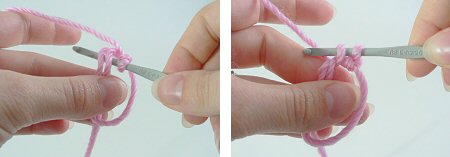
Make a large loop by putting the yarn tail behind the working yarn (the yarn coming from the skein) (Figures 1-2), leaving at least a six-inch tail until you become familiar with this method (Figure 3). Later, you may leave a shorter tail if desired.

2 3

With your hook, draw the working yarn through the loop, so you have one loop on the hook (Figures 4-6).

4 5

6

Ch 3 (counts as first dc) (Figure 7).

7

8
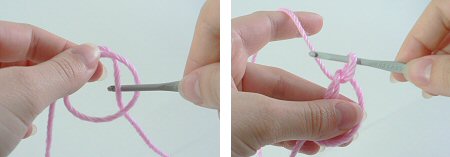
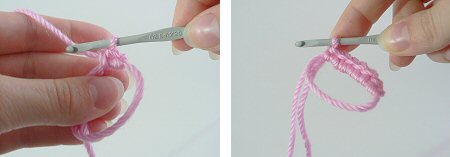
How you hold the loop while you work the stitches into it is personal preference, but I find it convenient to put both my pinky and ring finger inside the loop to hold it tight (Figure 8.)

Dc into the loop, crocheting over the tail (Figure 9). 9
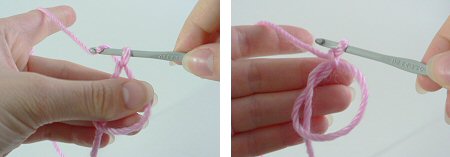
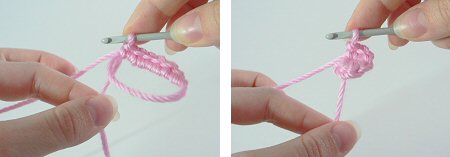
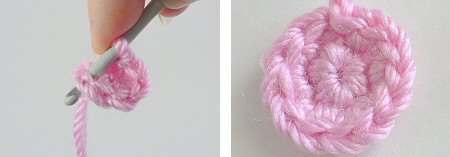
Continue to work as many dcs as needed for you pattern into the loop. (Don’t forget to keep crocheting over the tail.) When you are finished working stitches into the loop, you will likely find that the tail has curled around the loop a few times (Figure 10). To make it easier to draw the loop closed, first untwist the tail (Figure 11); then pull the tail to draw the loop closed. You can leave an open hole in the center (Figure 12) or draw it closed very tightly (Figure 13).
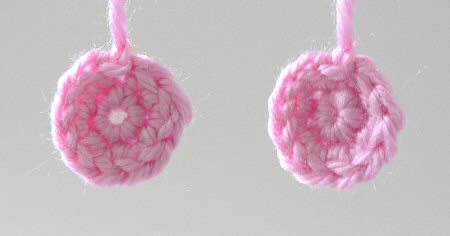
10 11

12 13

Saturday, March 21, 2009

Wednesday, March 18, 2009

Colorful Curtains


Love these curtains.

Monday, February 16, 2009

Dream House


This is the kind of house I like. Not so sure about the yellow exterior, but I definitely like everything inside.