When preparing your fabric, it’s important to account for the hem depth no matter what kind of hem you plan to create. We recommend planning your hem finish prior to cutting your fabric. Of course, sometimes if you run into a mishap in your cutting and are a bit short, a rolled hem can save the day because it requires such a small amount of fabric.
The basic rolled hem
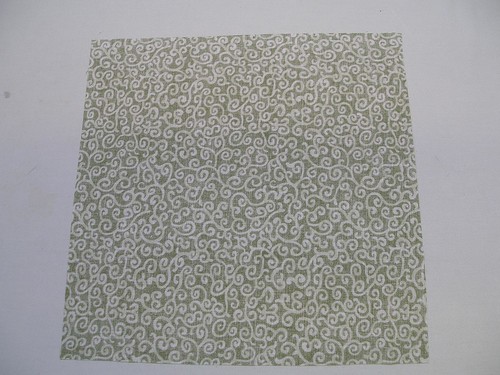
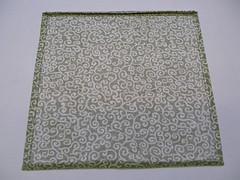
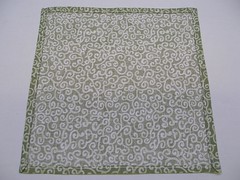
In our example, we are using a woven cotton fabric that is easy to press. Your results may vary slightly, depending on the type of fabric you’re using. As with most techniques, sew slowly... in this case, it helps maintain the roll of the fabric into the foot as well as the accuracy of the stitching. Also, as usual in our demonstrations, we are using a solid fabric with a contrasting thread to best show the stitching. You would normally use a thread to match your fabric, unless you were going for a decorative look.
- Press the edge of the fabric ⅛" to ¼" to the wrong side, depending on the width of the hemmer foot you’re using (see more about different width feet below). With a rolled hem, you normally do not use any pins.

- Set up your sewing machine for a straight stitch.
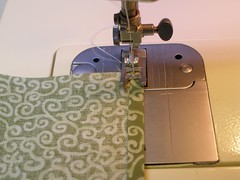
- Attach the Hemmer foot.
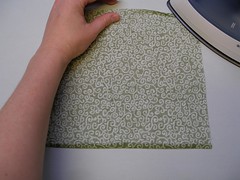
- Place the fabric under the foot, wrong side up.
- Before lowering the pressure foot, fold over the pressed edge so the needle is even with the edge of the fold and the guide on the foot. Your raw edge is now hidden in the fold.

- Lower the foot to hold the fabric in place.
NOTE: If your sewing machine has a knee lift feature, this is the time to use it so you don't have to remove your hands from the fabric.
- Lower the needle into the fabric. The needle should be right at the fold of the fabric

- Lift the pressure foot, but keep the the needle down in the fabric.

- Holding the edge of the fabric taut, insert the fold up and over into the guide of the foot.

- Begin to sew, continuing to hold the fabric taut, but not tight, allowing it to easily feed into the foot.

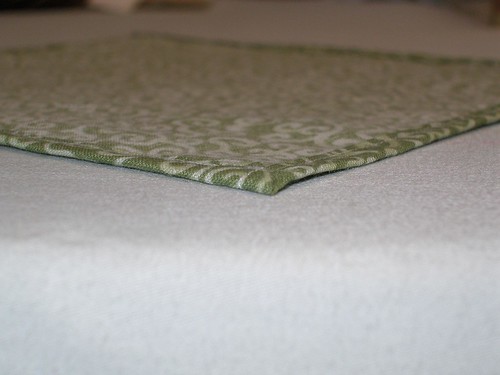
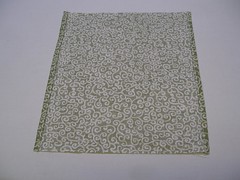
- The finished rolled hem will look like this.

Alternate methods for starting a rolled hem
Depending on the type of project you’re sewing, sometimes you need to start the rolled hem from a corner. In this case, it can be challenging to get the fabric sewn evenly from the edge. You can try one of two methods.
Tearaway stabilizer
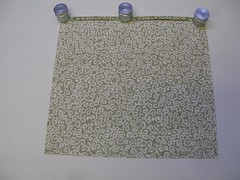
Placing a small rectangle of tearaway stabilizer underneath the fabric will help prevent the edge of the fabric from being pulled down under the sewing machine's needle plate. In addition, you can use the stabilizer to pull the fabric past the foot until you're just beyond the corner of the fabric, where you can begin to sew smoothly along the edge again.
- Prepare your fabric and sewing machine in the same manner as above.
- Cut a small rectangular piece of tearaway stabilizer. The piece we used was approximately 1” x 2”.
- Place the fabric under the foot, following the same steps as above.
- Place the tearaway under the corner of the fabric, so the majority of the rectangle is beyond the corner.

- Pull the stabilizer firmly to begin sewing from the edge.

- Continue with the rolled hem as described above.
Hand thread tail
Another method to help start fabric at a corner is to use a hand sewing needle and approximately 10” of thread.
- Thread the needle with the 10” of thread.
- Insert the needle into the folded portion of the fabric about ⅛" from the raw edge.
- Pull the length of thread halfway through the fabric.

- Slide the needle off the thread.
- Follow the same steps as above to prepare your fabric, then place it under the foot.
- Use the thread tail to gently pull the fabric as you begin to sew the rolled hem.

Rolled hems on slippery fabric
If you are planning to sew a rolled hem on a slippery or silky type of fabric, you'll quickly discover these fabrics do not like to be pressed along the edge. You can try, but usually, the standard ¼" fold we use in rolled hems, will simply unfold. This prevents you from getting an even fold inserted into the guide on the foot. For this, we have a solution! All you need to do is sew a line of stitching approximately ¼" (again depending on the width of your hemmer foot) along the raw edge. This line of stitching will allow you to more easily press the fold needed to sew a rolled hem. And, once pressed, the seam helps hold the fold in place.
- Set up your sewing machine for a basic straight stitch.
- Sew along the raw edge with a ¼" seam allowance. Your fabric is single layer here. You could use a Quarter Inch Seam foot for this step.
- Fold and press the fabric to the wrong side along the raw edge, using the stitching as your guide.

- Now you'll be able to fold the fabric over to sew the rolled hem!

- Follow the steps to complete rolled hem as described above.
Corners
If you decide to try sewing rolled hems on your next project, you may need to know how to turn a corner. You can approach this in two ways: a square corner or a mitered corner.
A square corner is the simpler of the two techniques, but there will certainly also be situations that call for the more professional finish of a mitered corner. Regardless of which method you choose, you will sew each side individually.
NOTE: Depending on the fabric type, especially for a bit thicker fabric, you may need to add a few hand tacking stitches at the corner where you can't quite catch the corners evenly.
Square corners
- Prepare fabric for a rolled hem as described above.
- Sew a rolled hem along one side of your project, following the steps for a basic rolled hem and using stabilizer or a thread tail to start if required.
- Remove the fabric from the machine.
- Press the next side as needed, folding the corner over the previously sewn rolled edge.
NOTE: You may find clipping back the corner at a slight angle before folding prevents the fabric from sticking out at the corner.
- Place the fabric back under the foot and sew another rolled hem. We recommend using a rectangular piece of tearaway stabilizer to help get over the "hump" at the corner.

- Sew the rolled hem along the next side.
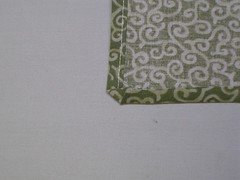
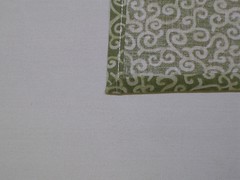
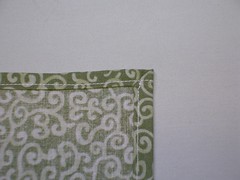
- Remove the fabric from under the foot and the tearaway from the corner. The corner will look like this, except... your thread will likely be the same color as your fabric!

- Continue around each side in the same manner until complete.
Mitered corners
- Fold down the corner point ¼" so it forms a diagonal line across the corner.

- Sew as close as possible to this folded edge.
- Trim away the point as close to the stitching as possible.

- Repeat for the remaining corners.
- Press the fabric to the wrong side along one side, starting at the clipped edge, in the same as if starting a basic rolled hem.

- Sew the rolled hem as described above. Here again, we recommend using tearaway at the corner.
- Remove the fabric from the machine.
- Prepare the next side, angling the fabric at the corner to create a miter.
- Sew the rolled hem, starting at the corner. Don’t forget that helpful piece of tearaway stabilizer!
- Here's a finished mitered corner. Ours looks just a tad messy because of the contrasting thread. With matching thread, it would be super pretty.

- Continue around each side in the same manner until complete.
Cross seams
- In certain projects, you may have to cross over an existing seam with a rolled hem. We often see this in garment sewing. The bulk of the cross seam can be too much for the hemmer foot.
- In order to keep your rolled hem smooth, you can cut the seam allowance at an angle on the cross seam to help eliminate the bulk.

- Or, you can jump over the seam and sew the rolled hem with the fabric flat – without putting the folded edge into the guide on the foot. To do this, when you approach the cross seam, stop with the needle in the down position
- Gently slide the fabric out of the guide on the foot, but without removing the fabric completely from the machine.

- Sew along the folded edge with the fabric flat under the foot.

- Once you are beyond the cross seam, stop with the needle in the down position, insert the folded edge back into the guide on the foot, and resume the rolled hem.

NOTE: Another cross seam option is to stop before the cross seam, back stitch, take the fabric completely out of the machine, then replace it under the foot again beyond the cross seam. Insert the fold back into the foot and resume sewing the rolled hem. Once you’ve sewn as much of the rolled hem as possible, go back and fill in the hem at the cross seams separately. Just remember to backstitch at the beginning and end of your short lines of stitching. Believe it or not, no one will inspect your rolled hem to see where you stopped stitching and filled in the stitches later.
Hemming around a circle
- If your project is in the shape of a circle, like a skirt, you will need to use a similar approach to ending the rolled hem.
- As you approach the point where you started, you will have to slide the folded edge out of the foot and sew the remaining hem flat, exactly how we sewed over cross seams in the section above.

Different width feet
Since Janome is one of our sponsors, they’ve been kind enough to provide us with a selection of Hemmer feet for our S4H studio machines.
The standard Hemmer foot is 2mm wide and comes standard with most Janome models. You can also purchase the optional Hemmer Foot Set, which contains two additional feet: a 4mm Hemmer foot and a 6mm Hemmer foot. We recommend visiting your local sewing machine retailer to find the appropriate feet available for your machine model and/or brand.
You can clearly see the differences between the Hemmer feet we have here in the S4H studio.
You can get an idea of the width of the rolled hem you will achieve with each foot by looking at the underside. The channel under each foot allows the rolled hem to easily flow out the back of the foot.
Determining which foot to use is fairly simple. The weight or thickness of your fabric will be your guide. The thinner the fabric, the thinner your rolled hem. Or, you may determine which one to use based on the depth of the rolled hem itself, especially if you are planning a decorative effect. Create a rolled hem with each size foot on a few scraps to test your decision.
Zig zag rolled hem
You do not have use a straight stitch for a rolled hem. You can also use a zig zag stitch.
If you look at the Hemmer foot more closely, you can see there is a wide opening where the needle goes through the foot.
It’s designed this way in order to be used with a zig zag stitch, because sometimes the kind of fabric we like to finish with a rolled hem is also the kind that frays easily, such as a sheer. One of the best ways to combat this is with a zig zag stitch.
Prepare your fabric and set up your sewing machine the same as for a basic rolled hem, but instead of selecting a straight stitch, select a zig zag stitch. Your finished rolled hem will look like this.
NOTE: We definitely recommend practicing on scraps to determine the width and length of your zig zag stitch first.
Serger rolled hem
Since we’ve mentioned it, we thought it would help to see what a rolled hem looks like when created with a serger. The premise is the same. The raw edge of the fabric is folded under and stitches hold the fold in place. However, since the nature of a serger is much different than a sewing machine, the edge of the fabric is trimmed, folded over, and wrapped with a 2-thread or 3-thread overlock stitch along the folded bottom edge all at one time – in one pass through the machine. This may look familiar to you from items you’ve purchased in stores.
Our last words of advice are: practice, practice, practice! Making a successful rolled hem takes a little patience, but the more you do it, the easier it becomes. Remember, you can always stop, remove some stitching, and start sewing again on an already rolled section until you can get the fabric rolling into the foot again.
Contributors
Sample Creation and Instructional Outline: Jodi Kelly


 Exactly the right amount of fabric must be fed into the hemmer scroll and this requires practice. If not enough fabric is fed into the scroll, the hem will fold only once and the raw edge will show.