Tuesday, November 27, 2012

How to give yourself a facial massage

Here's something we must do:

'You need to spend more time taking care of yourself,' she added, 'I clean my face twice a day, apply toner, serum and moisturiser - but each time I put something on my face, I massage the muscles for a few seconds to make them firm and bouncy. So, 5-7 minutes is my daily skincare routine.' Feeling  inadequate, I begged for extra help and Su-Man very kindly sent me her DIY massage routine:

Follow this sequence after cleansing your face. All the exercises are easier to do sitting down.

1) With elbows resting on a table, massage the face with moisturizer. Using the heels of both palms, start from the chin moving along the jaw bone up to the base of the ear 36 times  (I ask you to do each massage 36 times. The reason for this is that in Chinese culture the number six is considered a “lucky” number.

 2) Take the heels of both your hands from the edge of your nostrils and press along in one continuous line underneath the cheekbones up to the edge of your ears. Again, 36 times and always, in one direction. Never press downwards. You want to lift the face muscles up – not down!!

3) Take the middle fingers of both hands and press the area between your eyes and nose, at the very top of your nose. Press gently but firmly downwards following the nose line to the side of your nostrils. Do this 36 times. This also clears the sinuses and helps to improve your breathing.

4) Make two small claws with your four fingers of each hand. Put them together on the middle of your forehead and press quite firmly (without pulling the skin) in an outward direction, smoothly, until the temples. 36 times and again, only in one direction.

5) Tap around the eye sockets with your fingertips, use the natural weight of the fingers. Do not tap too hard! Six times above the eye socket and six times below. Do not tap the eyelids! They are too delicate and this can damage the eyes. This exercise reduces any puffiness or swelling above or below the eyes. Once a day is enough. To finish off this exercise you can continue tapping all over the face. But you only need to do this a few times.

6) Finally,after finishing the above exercises, take the fingertips of both hands, and tap everywhere on the scalp and cranium quiet strongly (using the natural weight of your fingers). Please note: it is not good to touch your face after this exercise as you can transfer dust and dirt from your hair.

When you have finished this sequence, I suggest you drink a glass of warm water to help the chi flow. Once a week, I recommend that you exfoliate and use a face mask.


Thursday, September 13, 2012

Portable Cushions

Link to tutorial.


Pillow Mattress

http://southerndisposition.blogspot.ca/2011/06/pillow-bed-tutorial.html


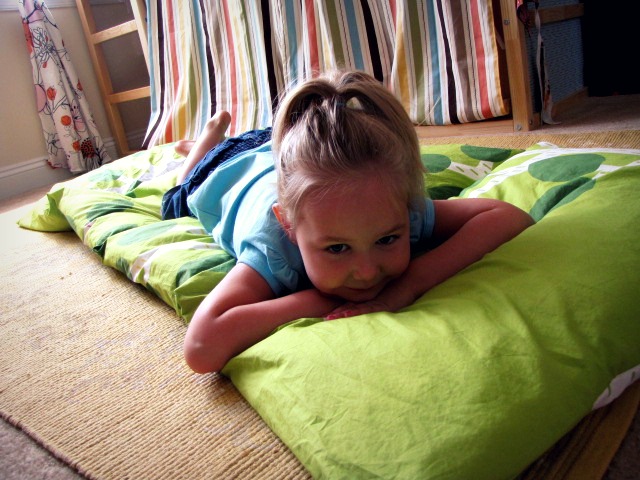
She found it on pinterest and thought I would like it. Welllll....she was right. Not only do I like it, but I could see an immediate need for one (why is it that you don't know you need something until you see it?). Since the one in the photo above is somewhere in England right now retailing for approximately $145 plus shipping...you know the rest, right? I'm super cheap.

If you'd like to pay $145 for it, you can get it here. If you'd like to make it yourself for a sliver of the cost, please see below:

First, I went to IKEA - here's my entire haul...one twin size duvet cover and five pillows.
The duvet cover was $9.99 and the pillows were $0.99 each (yes, you read that correctly). Total cost of this project? $14.94!! Who just saved 90%? I keep telling Eric I'm saving money, and he keeps asking me, "by buying things??" This is what marriage is all about, friends.

Step 1:
Measure. I eyeballed everything - I didn't even pull my tape measure out on this project. I liken this to my grandmother rationing ingredients at dinner...I don't know if she even owned measuring cups, but somehow the food was always delicious.

Here's how I measured:
Yep..."four pillows long" looks about right.

Step 2:
Cut the duvet cover to the desired width. Again, I eyeballed it based on the size of the pillows:
I ended up cutting the duvet cover exactly in half. Do you know what that means? I'll tell you what that means: it means that I have another pillow mattress just waiting for me to make it (it's probably going to wait a while).

Step 3:
Cut the top half of the duvet cover lengthwise so that the bottom edge sticks out a few inches further - like so:
The longer edge will fold under to make a pocket (so that you can't see the pillows when they're in the cover).

Step 4:
Hem all raw edges.
This was the longest step and it probably took 15 minutes.

Step 5:
Make the pocket. Fold the long edge (from step 3) inside under the short edge. I turned the entire cover inside out, folded the long edge, and then sewed up the sides width-wise (made about a 3" stitch at the top and the bottom of the cover).
Once I turned it right-side-in, the pocket was tucked neatly under the short side so that you couldn't see it. The widths of the long side and the short side match now (so I guess they aren't exactly "long" and "short" anymore).

Step 6:
Divide the cover into quarters by sewing three lines across the width.
This will make the "pillow cases."

Step 7:
Insert pillows:
Et Voila...a Pillow Mattress!

Here it is in it's new home, the "Princess Fort"

And here it is being used by the princess herself:

Really easy project - time commitment is about 45 minutes, and the pillows and cover are washable!

Happy sewing!

PS - here are the products used in the "Princess Fort." Enjoy!

Twofold Scarf to Make

http://southerndisposition.blogspot.ca/2011/11/anthropologie-lucia-loop-knockoff.html


I wanted the Anthropologie Lucia Loop, but it's $78. Seven. Eight. Too much for a scarf, n'est-ce pas?

It's beautiful, but it's not worth $78.

Enter tutorial.

Step 1: Cut two 12"x 60" pieces of silky coordinating fabric (longer for a longer loop, shorter for a shorter loop)

Step 2: Stitch the long sides of the fabric together wrong side out.

Step 3: Flip right side out - you should have a silky tube.

Step 4: Fold the tube so that the short ends are together...you should have FOUR layers of fabric...two of one fabric (on the outside) and two of the other (on the inside):

Step 5: Make sure the existing seams are even and start sewing the TWO INSIDE layers together. Take care to keep the outside layers pushed out of the way so that you don't accidentally stitch over them.
(Notice my thumb and forefinger keeping the bottom layer out of the way of the presser foot). You will continue around the loop until you get to the two outside layers...keep sewing until you can't sew another stitch without making a mess...you'll know when that moment is...

Step 6: Eventually, there won't be any more space to sew, but you'll still have a hole. No prob. Flip your scarf so that the "invisible seams" you just sewed on the short sides are tucked in. You'll have a little hole left like this:

Step 7: Get out a needle and thread, and sew the remaining couple of inches shut.

Once you're done, you'll have your own knockoff Lucia Loop Scarf!

Sunday, July 08, 2012

Knitted Bag

Saw a photo of this bag I knitted in March 2007.


Sunday, June 10, 2012

Dining area love

I love this dining area at Amanda Peet's home.